Building Layer-3-Only EVPN Lab
A few weeks ago, Roman Dodin mentioned layer-3-only EVPNs: a layer-3 VPN design with no stretched VLANs in which EVPN is used to transport VRF IP prefixes.
The reality is a bit muddier (in the VXLAN world) as we still need transit VLANs and router MAC addresses; the best way to explore what’s going on behind the scenes is to build a simple lab.
Roman provided a lab using SR Linux, but what if you want to use some other devices and don’t know how to configure them correctly? Let’s use netlab to build an EVPN network with two switches, two VRFs, and two hosts attached to each VRF. All links will be layer-3 point-to-point links, and we’ll mention VLANs only because the netlab VXLAN module requires the VLAN module to work.
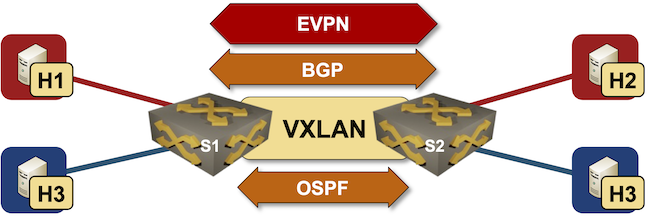
Here’s the lab topology we’ll be using:
Let’s walk through the lab topology:defaults.device: eosprovider: clabmodule: [ ospf, bgp, vrf, vlan, vxlan, evpn ]bgp.as: 65000groups:_auto_create: Trueswitches:members: [ s1, s2 ]hosts:device: linuxmembers: [ h1, h2, h3, h4 ]vrfs:red:links: [ h1-s1, h2-s2 ]evpn.transit_vni: Trueblue:links: [ h3-s1, h4-s2 ]evpn.transit_vni: Truelinks:- s1:s2:mtu: 1600
- Lines 1-2: We’ll use Arista cEOS containers. I’ll describe how to use other devices at the end of this blog post.
- Line 4: The Arista cEOS switches will run OSPF (to provide loopback-to-loopback connectivity), BGP (to support EVPN), VRFs (we’re talking about layer-3 VPNs), VLANs (because the VXLAN module is not happy without a VLAN module), VXLAN (to implement EVPN transit VNI), and EVPN (to exchange VPN prefixes).
- Line 5: The lab will use IBGP in AS 65000.
- Lines 6-8: We’ll simplify the node definition with groups.
- Lines 9-10: The lab has two switches: S1 and S2
- Lines 11-13: The lab has four Linux hosts: H1 through H4
- Lines 15-21: The lab has two VRFs, each with two host-to-switch links. The VRFs use EVPN transit VNI (that’s how we tie VRFs with EVPN).
- Lines 23-26: We need the inter-switch link. It must have a larger MTU to transport VXLAN-encapsulated Ethernet frames.
The easiest way to start the lab is to use GitHub Codespaces (the lab topology is in the EVPN/l3vpn directory). As of August 2024, you still have to upload the cEOS container image manually (or use frr containers)
After starting the lab with netlab up, you should see two IP prefixes in each VRF, and the hosts should be able to ping each other.
s1>show ip route vrf red|begin Gateway
Gateway of last resort is not set

 C        172.16.0.0/24
           directly connected, Ethernet2
 B I      172.16.1.0/24 [200/0]
           via VTEP 10.0.0.2 VNI 200000 router-mac 00:1c:73:eb:d5:13 local-interface Vxlan1
$ netlab connect h1 ping h2
Connecting to container clab-l3vpn-h1, executing ping h2
PING h2 (172.16.1.4): 56 data bytes
64 bytes from 172.16.1.4: seq=0 ttl=62 time=2.902 ms
64 bytes from 172.16.1.4: seq=1 ttl=62 time=1.076 ms
64 bytes from 172.16.1.4: seq=2 ttl=62 time=1.632 ms
64 bytes from 172.16.1.4: seq=3 ttl=62 time=1.307 ms
64 bytes from 172.16.1.4: seq=4 ttl=62 time=1.743 ms
^C
--- h2 ping statistics ---
5 packets transmitted, 5 packets received, 0% packet loss
round-trip min/avg/max = 1.076/1.732/2.902 ms
Next: Layer-3-Only EVPN: Behind the Scenes Continue
Using Other Lab Devices
You can replace cEOS containers with any device supported by the netlab EVPN module:
- Download the device image and build a Vagrant box or a vrnetlab container. You can skip this step if the device containers can be downloaded automatically (Cumulus Linux, FRRouting, Nokia SR Linux, VyOS)
- Change the lab topology’s
defaults.deviceandprovidersettings. For example, use thefrrdevice to run FRRouting containers. - Start the lab with netlab up and have fun ;)
Alternatively, you could:
- Start the lab with netlab up -d device -p provider parameters.
- Set the NETLAB_DEVICE and NETLAB_PROVIDER environment variables.
What fun! Thanks!!
I did have to alias the docker image to match the eos 4.31.2F version the netlab seems to want to start.
Alternatively, is there a place I can specify, for example, eos 4.32.1F (current)? Newb question, I know.
Thanks again!! This was otherwise super easy.
One of the core ideas of netlab is that everything is configurable ;) You can change the default image for a device in three ways (in the lab topology, in the user defaults, and through an environment variable):
https://netlab.tools/defaults/#example-changing-device-type-and-device-image
You can also specify the image a node should use:
https://netlab.tools/nodes/
However, it seems like that information is not trivial to find (no surprise there), so how could I make it easier to find? Where would you expect to find it? Where should I put a link to that information?
Thank you!